168 – She Shares Ideas for Homemade Heartfelt Presents – For Mother’s Day or Any Day!

One of my favorite blogs – Kindergarten Basics Blogspot – always shares simple ideas on how parents and teachers can make learning fun.  In this easy craft, kids learn to tie a bow and get to repeat the process over and over to complete a one-of-a-kind wreath for mom (or grandmom) to enjoy.

Although store-bought gifts are nice, many parents and grandparents point to homemade treasures, cards or simple gifts from their children as their most prized possessions for their sentimental value.  This mother’s day craft allows you to upcycle scraps of ribbons and a few other basic materials and end up with a great gift any child would be proud of.

http://kindergartenbasics.blogspot.com/2013/05/teach-kids-to-tie-bows-and-make.html

167 – Make The Easiest Worm Box – Ever!

Worms are a great way to have a more productive home garden.  Creating a simple worm box is a perfect way to learn about nature plus make excellent compost in small quantities at the same time.

Here’s an easy way to turn plastic cake holders or similar containers (especially those that can “nest” inside each other) into a real working worm farm that would fit under any sink on in any pantry.

Here’s what you need to begin:

Pan for underneath the worm box.

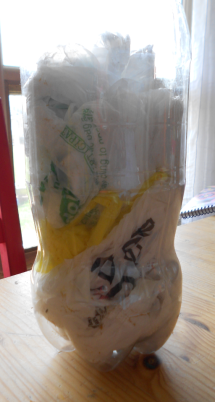
One (or more) plastic container that can “nest” inside each other.  One must have a lid.

Tools for poking holes in the plastic.

Small pieces of wood, legos or plastic objects to keep the main worm bin in a position to drain.

Bedding for the worms such as dried vegetation, dried weeds, a small bit of hay or straw or shredded newspaper.

Food scraps to feed the worms.

Worms!

Squirting water bottle (optional)
———–
Begin by getting your worm house ready!  Place your pan beneath where your worm house will be as it will catch the run-off water from the worms.  This pan needs to have no holes in it.

Next, poke a series of small pin-prick sized holes in the bottom of your main container.  Remember that the goal is to keep the area damp but not soaked, so these holes will allow the water to run into the pan beneath.  To aid with draining, make sure you’ve put the small wooden blocks or plastic objects on the pan so your first container sits up a bit and allows for good drainage.

Now you need some worm bedding.  You can often find dried leaves, weeds or grass in any yard or park.  Straw or hay work as well.  Newspaper can work but introduces inks and dyes and may not be a good choice if you are putting your compost into the garden.

Next, make sure you’ve mixed in some of the types of things that serve as worm food.  Throw in your discarded banana peels, eggshells, coffee grounds, vegetable peelings and similar objects.  You might be surprised how this reduces your trash.  If the mixture seems dry, use a water bottle and give it a spritz of two of water so it will be wet and welcoming for your worms.

Going On A Worm Hunt!

Sure, can order worms from the internet, then you miss out on all the fun.  If you take a walk after a rain, you can often rescue quite a few that will live happily in your worm bin.  If you can’t do a post-rain walk, begin digging in a garden or looking under logs or piles of leaves, you’ll slowly find out more about which habitats worms enjoy.

Upkeep?  Keep your worm box damp and make sure to remove the compost water that you find at the bottom.  It’s really nutritious for plants, so make sure you “feed” it on any plants you have, indoors or out!  Also remember to add worm goodies periodically to eat so they always have new food to cycle through for you.

Also, make sure you keep the lid on your box to keep the area damp when not observing the worms or adding water or food.

A Worm Apartment House

If one worm box is not enough, you can turn it into a worm apartment house like the one pictured at the top of this post.  To do this, get another plastic container that is the same size and shape.  In this container, poke larger holes – large enough so that the worms can crawl through them.  Then fill the second container with the same type of bedding and some food scraps and set it on top of the other, placing the lid on top.  In this way, once the worms in the bottom container finish their food and leave compost, they will crawl up through the holes and begin on the next batch.  You can remove the lower area, use the compost, fill with bedding, replace it on top and begin the cycle again.

It’s a great way to learn about nature, use food scraps instead of trashing them and make useful compost all at the same time!

worms-in-compost-Fun Related Posts

Kindergarten Unit on WORMS!

http://www.theusualmayhem.com/search/label/Wormy%20Wednesdays

Compost Bin Sensory Play  (This post is so much fun!)

http://trainupachildlearnaswego.blogspot.com/2013/04/compost-bin-sensory-play-wash-and-learn.html

A Worm Box + Worm Lunch Post:

http://www.jdaniel4smom.com/2011/05/muffin-tin-muffin-celebration-of-worms.html

166 – Don’t Throw Out Your Easter Egg Dye – Use It To Make Rainbow Seashells!

After you’ve finished up your Easter egg dying, don’t toss out the jars of dye.

We love a recent post by The Educator’s Spin On It who have step-by-step directions on how to turn extra shells into a rainbow of fun by reusing Easter egg dyes.  The link to this simple craft is below, but we also encourage you to check out their site.  There are so many great ways of creating quality time with your kids without spending more money or consuming more stuff.

And they show you how to make it educational, too!  It’s website well worth a visit:

The Educator’s Spin On It – Home Page

http://theeducatorsspinonit.blogspot.com/

The Educator’s Spin On It – Rainbow Seashells Craft:

http://theeducatorsspinonit.blogspot.com/2013/04/rainbow-sea-shells-after-school-link-up.html

165 – She Shows You How To Color Easter Eggs With All Natural Dyes!

Want to have a greener Easter?

This all natural craft is direct from Diane Kidman’s awesome blog (see link below).  She’s given us permission to print her instructions here so you can create a rainbow of natural eggs for Easter morning or just for the fun of it!

We tried it with materials we found around the kitchen and came up with these little beauties pictured above! Here are Diane’s instructions:
———————
Here’s how to color your Easter eggs naturally, using things like spices and vegetables.  Some of the colors are vivid, others more earthy and muted; I think the overall effect is beautiful.

Don’t forget to buff the eggs w/ a touch of olive oil for a nice shine.

Preparation: In a pan add water, a vegetable, fruit, or spice from the list below, and a tablespoon of vinegar. Bring to a boil, reduce heat, and simmer for 20 – 30 minutes. Allow the water to cool to room temperature, strain out the veggies, fruit, or spice, (unless you want speckled eggs) and add the already-boiled eggs. You can leave the eggs in the color for as long as you wish, even overnight in the fridge, to get the desired color. Here’s the color chart that will tell you which natural item to use with your eggs:


Red: 3 Tbs. Chili Powder (reddish orange) or lots of red onion skins (purplish red) or chopped fresh beets


Orange: Yellow Onion skins


Yellow: Ground Turmeric or Orange Peel or Lemon Peel or ground cumin


Green: Spinach Leaves; or mix turmeric with red cabbage 


Blue: Red Cabbage Leaves (about 1/2 a head, chopped) or canned blueberries
Violet:

Purple Grape Juice (no need to boil first or to add water)

Visit the DK Mommy Spot – Natural Family Living Through Herbalism, Education and Eco-Friendly Products

https://dkmommyspot.com/

163 – She Shares How To Make Music A Part of Homeschool Learning By Creating Recycled/Inexpensive Instruments!

One of our favorite blogs to visit is called “Kathy’s Cluttered Mind”.   We especially like her recent post about 10 creative musical projects that kids can make to explore music at home.  From cymbals, paper plate tambourines, spin drums, string things and didgeridoos, there are hours of musical fun here without buying a single thing!

Here’s a bit about Kathy and the complete musical post is listed as a link below:

Kathy quit her full time job in July 2011 to stay at home and homeschool her two children (ages 5 and 7). She is also a wife to her wonderful husband whom she married on her 19th birthday in 2000. She lives in Georgia just north of the hustling and bustling city of Atlanta. When she is not homeschooling the kids she enjoys blogging, scrapbooking, hiking, geocaching and watching movies.

10 Easy/Inexpensive Instruments To Make With Your Kids

http://www.kathysclutteredmind.com/2013/02/10-easyinexpensive-instruments-to-make.html

162 – They Show You How To Make Homemade Laundry Detergent

You’ll find some great  information about green cleaning here.

Want to rid your house of harmful chemicals used in cleaning?  DIYNatural.com  is one site on the internet that offers an easy recipe for creating homemade laundry soap.  The cost is much less then store brands and you get to choose exactly what goes into it.   And what goes out into your waste water or septic tank!

Check out this post as a great starting place and also read through the comments.  Many readers have helpful tips and suggestions about the laundry soap recipe or different ways they clean with natural ingredients.

http://www.diynatural.com/homemade-laundry-detergent-soap/

161 – She Creates Homemade Toys For Crafty and Creative Fun!

Another blog we love to visit is “Crafty Mom Shares”.  Carries has lots of inspiration about how to make your own fun at home while learning and growing with your kids.

Take a look at this recent post of a classic homemade toy – dolls made from clothespins.  Instead of premade and plastic “people”,  kids can put their own ideas and imagination into the “play world” they create.   And making the accessories and building the world is a great way to spend time together with parents and siblings of all ages and abilities able to contribute to creating the new kingdom.

Visit Crafty Moms Share for more simple ideas that can provide hours of creative, homemade fun!

http://craftymomsshare.blogspot.com/

160 – Her Kindergarten Creates With Cardboard!

There’s a wonderful blog in Greek and English from a Kindergarten teacher in Greece.  Maro’s Kindergarten shows some of the wonderful ways her class works with the simplest items and turns them into truly exciting, creative play.

Visit Maro’s blog and check out how cleverness and creativity can rule as “premade and plastic” take a back seat.

http://maros-kindergarten.blogspot.com/2013/02/blog-post.html

(157) They Show You How To Be A Friend To Pollinators

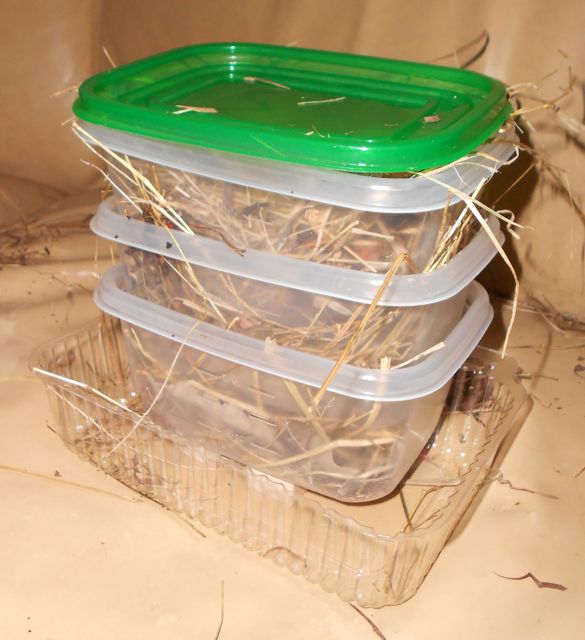
Did you know that animal pollinators are needed for 35% of the world’s food crops?

And – without pollinators, there would be no chocolate, almonds, melons, strawberries or blueberries?

Although many people have heard about the disappearance of bees, these websites will help you understand more about all the different types of pollinators and how you can make a difference in this important matter.  Changes suggested are simple and can be done anywhere by anyone – such as having a water source for bees and butterflies or leaving dead trees or logs around so that there will be as a safe habitat for pollinators.

Learning more about your local environment and what can be done to help can be a lot of fun as well as a practical way to love the Earth.   Check out these helpful resources:

All About Insects and Pollinators from the USDA site:

http://www.nrcs.usda.gov/wps/portal/nrcs/main/national/plantsanimals/pollinate

How Gardeners Can Help Pollinators

http://www.nrcs.usda.gov/wps/portal/nrcs/main/national/plantsanimals/pollinate/gardeners

How Farmers Can Help Pollinators

http://www.nrcs.usda.gov/wps/portal/nrcs/main/national/plantsanimals/pollinate/farmers

Short video – Be A Friend To Pollinators From  Earth Knowledge Portal

http://www.earthknowledge.net/index.php/knowledgeportal/49679-be-a-friend-to-pollinators

(152) They “Teach Their Children Well”

crafting from recycled shipping boxes

Do you remember the Crosby, Stills,Nash and Young song titled “Teach Your Children Well?”

We’ve been thrilled to hear from lots of moms and dads who feel that one of the best things they can do is to spend time “being green” with their kids. This includes teaching them to recycle, turning recycling into games, feeding the  birds, crafting with recyclables, gardening and working on reducing water and electric use at home.

Amanda Jo writes to us on this topic:  “Teaching my daughter (the next generation) how to recycle and garden. Is my way of helping the earth.”

(150) She Encourages Others To Beautify The Earth With Gardens and Trees!

Tabitha sent us this suggestion that is so simple, but makes a huge difference:

“Plant a garden or a tree!”

Planting trees and gardens is a great way to make the Earth more beautiful and more bountiful.  Here you see a plum tree in full bloom in Spring. Beautiful now, and delicious (organic) fruit will follow later in the year!

(149) She Isn’t Crazy – She Upcycles Stuff Into New Cool Items and Gifts!

Okay, I’ll admit it.  I just hate to see a useful item on a curbside trash pile.  I have a kindred spirit in Lisa who writes:

“My kids think I’m insane but, I make a difference by finding old thrown out furniture and items in the trash and upcycling it or refinishing it into beautiful new things. Keeping useable items out of landfills makes me happy. I also use my old jars etc, to make gift jars to give out. I paint them, add a little bling and fill them with candy, tea, coffee or whatever I have on hand, and then I find people who could use a little love in their life and gift it to them.  Makes people happy and saves the earth, what could be better!”

(148) Her Family Chooses A Vegetarian Diet

Jessica writes from Arizona where her family are helping the Earth by eating lower on the food chain.  She writes:

“My entire family is vegetarian which helps the planet in so many ways. We also only use CLF bulbs and are on a time use plan with our electricity. I also car pool daily.”

Small changes in everyday activities (like eating habits or travel choices) can truly make a big difference when practiced by many people !

(141) She Reuses Plastic Bags For Trash

plastic trash bags awaiting reuse in a recycled soda bottle "dispenser"

Monica commented on reusing the plastic bags often given out at grocery or other stores: “I am green as I try to find many ways to not only recycle, but reuse items before going to the landfill.  I don’t buy plastic bags for waste baskets, instead I reuse the plastic bags from stores.”

Here you can see a bevy of plastic bags ready for reuse inside a liter soda bottle “dispenser”, created by simply cutting the top off of a soda bottle.  It’s a great way or storing these plastic bags until a good reuse for them is found.

(133) She Takes Pride In A Shrinking Garbage Can

One way to measure how well you’re doing at recycling or consuming less is to check the size of your waste can.  Tammy writes to us:

“We love to recycle and reuse. It is even more fun if we get to reuse something and then recycle it! It is fun to see our garbage pail getting smaller as we find more things that we can recycle.”